
개요
Kubernetes의 서비스(Service)는 우리의 어플리케이션 아키텍처 내에서 트래픽을 전달해주는 역할을 수행한다.
대표적으로 4가지 기능을 제공하여 트래픽의 조작과 관리를 수행하며 다음과 같다.
- 서비스 디스커버리: 내부 DNS를 이용해 서비스 이름으로 API 호출
- 서비스 레지스트리: 서비스에 연결된 pod ip를 자동으로 관리
- 로드밸런싱: 연결된 파드에 골고루 트래픽을 분산
- 서비스 퍼블리싱: 외부의 접속을 내부 pod까지 전달
위 4가지 기능을 중심으로 서비스의 각 기능과 용도에 대해 살펴보자.
Kubernetes Service 기능의 종류와 사용법
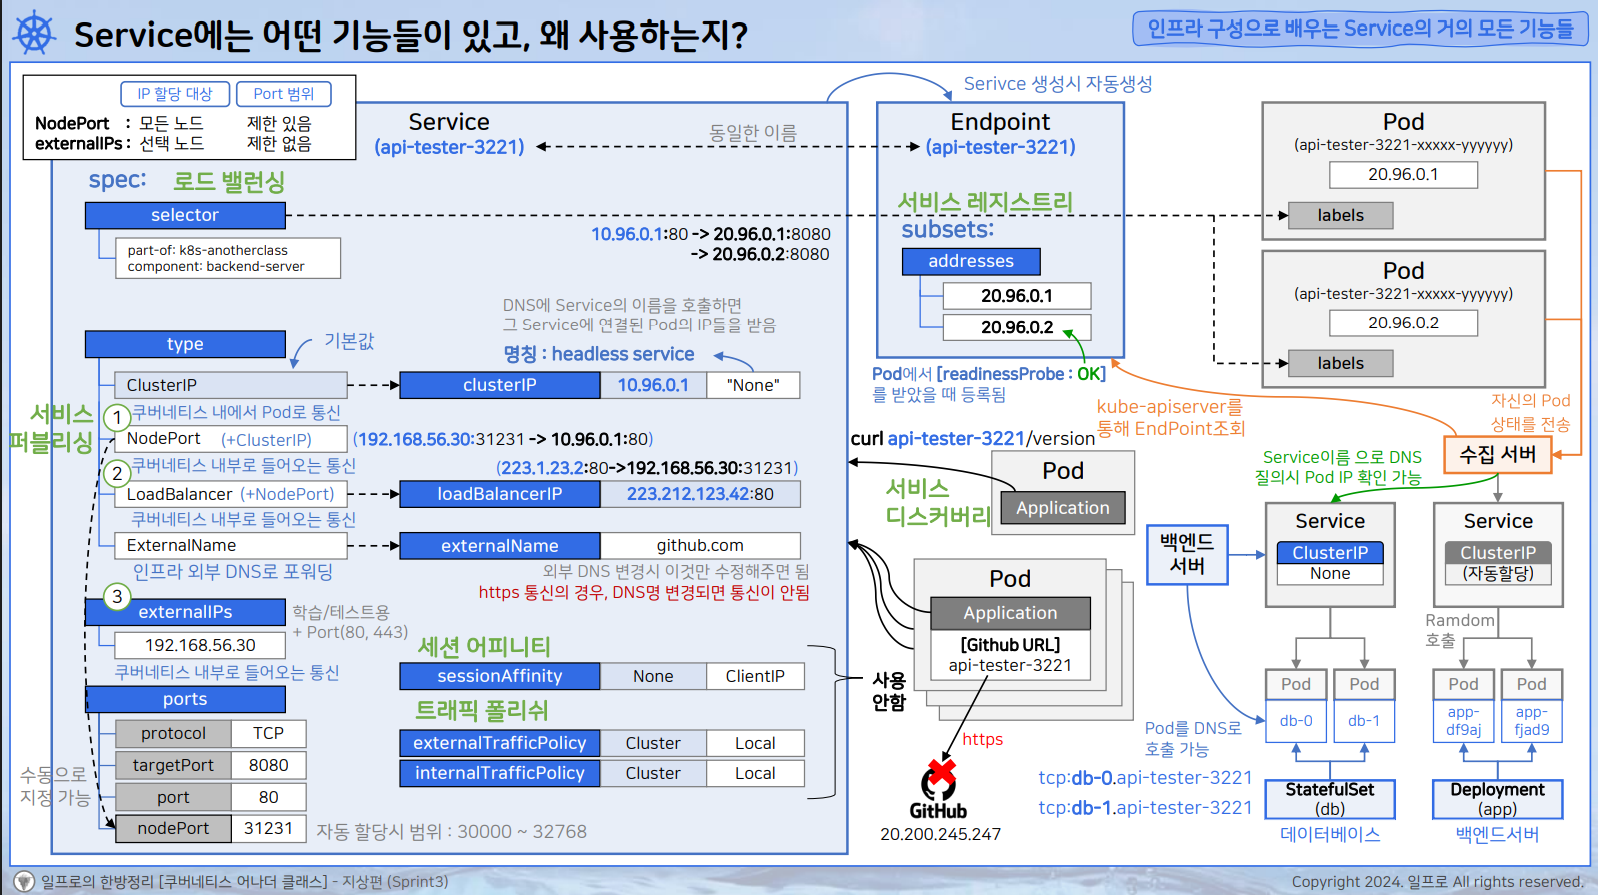
먼저 서비스의 속성에는 selector가 존재한다. 이를 통해 selector가 일치하는 pod들에게 트래픽을 분산해준다. (로드밸런싱)
서비스가 생성됨과 동시에 서비스와 동일한 이름으로 Endpoint 오브젝트가 자동으로 생성된다.
Endpoint 내부에는 subsets 속성이 존재하고 연결된 pod ip 주소들을 저장하고 있다. 이로써 '서비스 레지스트리' 기능을 수행한다.
새로운 pod 가생성되면 자동으로 쿠버네티스가 해당 endpoint subset에 새로운 pod의 ip를 추가해준다.
무조건 추가하는 것은 아니고, pod의 readinessProbe 상태가 OK일 때 ip를 등록한다.
만약 작동중이던 pod의 readinessProbe가 실패할 경우 ip 주소를 제거했다가 다시 성공할 때 재등록한다.
livenessProbe가 실패하면 pod는 재기동하는 것. 헷갈리지 말자.
다음으로 각 type의 서비스들이 어떻게 작동하는지 알아보자
ClusterIP
ClusterIP는 서비스 타입의 기본값으로, 쿠버네티스 내부에서 pod로 통신하기 위한 기능이다.
서비스의 ip가 할당이 되고 누군가 이 ip로 트래픽을 보내면 endpoint ip로 포워딩한다.
# deployment.yaml
ports:
    - containerPort: 8080
name: httpapiVersion: v1
kind: Service
metadata:
namespace: anotherclass-322
name: api-tester-3221-clusterip
labels:
part-of: k8s-anotherclass
component: backend-server
name: api-tester
instance: api-tester-3221
version: 3.0.0
managed-by: kubectl
spec:
selector:
part-of: k8s-anotherclass
component: backend-server
name: api-tester
instance: api-tester-3221
ports:
- port: 80
targetPort: http
type: ClusterIP
위와 같은 yaml 파일 설정이 있다고 가정해보자.
service의 ports에서 targetPort는 pod의 컨테이너 포트이다(8080).
vagrant@personal:~$ k get svc -n anotherclass-322
NAME                           TYPE           CLUSTER-IP       EXTERNAL-IP                                                       PORT(S)        AGE
api-tester-3221-clusterip      ClusterIP      10.98.202.82     <none>

vagrant@personal:~$ k get endpoints -n anotherclass-322
NAME                           ENDPOINTS                                 AGE
api-tester-3221-clusterip      192.168.13.223:8080,192.168.13.224:8080   48m
생성된 service, endpoint를 확인해보면 service에 cluster ip가 부여됐고 endpoint에 subset으로 pod ip가 저장된다.
따라서 10.98.202.82:80 으로 트래픽을 전송하면 파드인 <192.168.13.223:8080>,<192.168.13.224:8080>으로 포워딩 된다.
"curl api-tester-3221/version" 커맨드를 실행하면 서비스 DNS가 자동으로 서비스명을 ip 주소로 변환해준다. 이 기능이 "서비스 디스커버리"이다.
NodePort
노드포트(NodePort)는 쿠버네티스 내부로 들어오는 통신을 담당한다.
수동으로 포트 번호를 지정 가능하고, nodePort를 지정하지 않으면 30000~32768 사이로 랜덤 부여한다.
vagrant@personal:~$ k get svc -n anotherclass-322
NAME                           TYPE           CLUSTER-IP       EXTERNAL-IP      PORT(S)        AGE
api-tester-3221-nodeport       NodePort       10.109.182.94    <none>           80:30221/TCP   45m
서버로 트래픽이 들어오면 -> 서비스(ClusterIP)로 전달 -> Pod로 전달 된다. 예시는 아래와 같다.
<SERVER_IP>:30221(NodePort) -> 10.109.182.94:80(ClusterIP)
운영환경에서는 쓸 일이 없다. nodePort가 필요없다는 뜻은 아니고, 해당 포트로 직접 API를 날리지 않는다.
LoadBalancer
로드밸런서 역시 쿠버네티스 내부로 들어오는 통신을 담당한다.
클러스터 외부에서 클러스터 내부로 트래픽을 보내야 하는 경우 사용한다.
새로운 IP가 생성되고 NodePort의 역할을 포함한다.
vagrant@personal:~$ k get svc -n anotherclass-322
NAME                           TYPE           CLUSTER-IP       EXTERNAL-IP    PORT(S)        AGE
api-tester-3221-loadbalancer   LoadBalancer   10.110.90.97     <pending>      80:31469/TCP   45m
로드밸런서에서 노드포트로 트래픽이 전달되고, 그 후 노드포트에서 클러스터ip로 전달된다.
223.1.23.2:80 (LoadBalancer) -> <SERVER_IP>:31469 (NodePort) -> 10.110.90.97:80 (ClusterIP)
이렇게 NodePort와 LoadBalancer 처럼 외부의 접속을 내부 pod로 전달하는 것을 "서비스 퍼블리싱"이라고 한다.
externalIPs 속성
externalIPs는 서비스 type은 아니고 서비스의 속성이다.
apiVersion: v1
kind: Service
spec:
  selector:
    part-of: k8s-anotherclass
    component: backend-server
    name: api-tester
    instance: api-tester-3221
  ports:
    - port: 80
      targetPort: http
  type: ClusterIP
  externalIPs:
- 192.168.56.30이렇게 externalIPs에 워커 노드의 IP를 지정할 수 있다. 지정된 노드 IP를 통해 외부의 pod와 통신할 수 있다.
기능적인 측면은 NodePort와 동일하지만 다음과 같은 차이가 있다.
- NodePort는 모든 노드, externalIPs는 선택한 노드에만 포트가 할당된다.
- NodePort는 포트의 범위 제한이 있다(30000~32768). externalIPs는 제한이 없다. 따라서 80, 443 포트 사용 가능.
type과 별도로 속성이 존재하기 때문에 type과 별개로 지정할 수 있다.
외부에서 내부로 통신해야 하는데 80, 443 포트 번호를 사용해야할 때 테스트 용도로 사용한다.
하지만 워커 노드의 IP는 노드가 변경되면 바뀔 수있고, 하나의 노드에만 트래픽이 보내지는 것도 그렇게 좋지 않다.
따라서 externalIPs 보다는 nodePort를 사용하는 것이 좋다.
ClusterIP type의 서비스에 외부 통신 테스트 용도로 잠깐 추가하여 사용하는 경우가 많다.
ExternalName
ExternalName은 인프라 외부 DNS로 포워딩 하는 용도로 사용한다.
apiVersion: v1
kind: Service
metadata:
  namespace: anotherclass-322
  name: database-externalname
spec:
  type: ExternalName
externalName: database-0.database-headless.anotherclass-322.svc.cluster.localgithub.com 같은 DNS 이름을 속성으로 주어야 한다.
특정 pod에서 해당 인프라 외부 DNS로 포워딩 되어 해당 도메인 이름에 대한 IP주소를 알아내 통신이 가능하게 한다.
파드에서 외부로 나가기 위한 용도로 사용된다.
그렇다면 왜 파드에서 직접 github.com을 호출하지 않고 externalName으로 서비스를 경유하게 할까?
이유는 많은 pod들이 존재하고, pod 내부에 github url이 있는데 코드 저장소가 바뀐 경우(gitlab 으로)
pod들을 건드리지 않고 externalName의 도메인 이름만 변경해주면 편리하게 업데이트가 가능하다.
하지만 https 통신의 경우 DNS 이름이 변경되면 통신이 되지 않는다.
그 이유는 api-tester-3221으로 request를 날렸을 때 서비스가 경유되오 공인 DNS로부터 github.com의 IP를 알아내 해당 IP와 통신한다. 이 때 https의 경우 pod가 보낸 도메인 이름을 확인하는데, 서비스 이름인 api-tester-3221과 github.com의 도메인 명이 다르기 때문에 변조를 의심하여 통신을 신뢰하지 않게 된다.
따라서 externalName은 의도는 좋지만 사실 잘 사용하지 않는다.
Headless Service
위 4가지 type의 서비스 말고도, 추가로 헤드리스 서비스라는 기능이 존재한다.
ClusterIP 타입으로 서비스를 생성하고 ClusterIP 속성에 'None'으로 넣어 생성하는걸 headless service라고 한다
apiVersion: v1
kind: Service
spec:
  selector:
    part-of: k8s-anotherclass
    component: database
    name: database
    instance: database
  type: ClusterIP
  clusterIP: None
이렇게 생성한 서비스로 DNS 호출하면 service ip가 아니라 service에 연결된 pod들의 ip 목록을 받을 수 있다.
따라서 클라이언트가 직접 ip를 전달받아 pod로 직접 통신할 수 있다.
그렇다면 왜 이런 기능이 필요할까?
수집 서버 입장에서 서비스를 통해 pod를 호출하면 랜덤하게 호출한다. 따라서 명시적으로 pod를 호출할 수 없다.
또한 MSA에서 전체적인 트래픽을 줄이기 위해 pod가 자신의 상태를 수집 서버에 전송해야 한다.
수집 서버는 kube-apiserver를 통해 endpoint를 조회하고 연결된 모든 pod ip를 확인할 수 있다.
따라서 pod ip만 알아내고 싶다면 headless service를 통해 전체 ip 목록을 받아올 수 있다.
자주 사용하는 사례는 다음과 같다.
백엔드 서버에서 해당 pod가 데이터베이스일 때 headless service를 사용한다.
백엔드 앱에는 clusterIP를 붙이고 트래픽이 랜덤하게 전달된다. 또한 deployment로 생성되어 랜덤하게 이름이 부여되고 딱히 상관은 없다.
하지만 데이터베이스 파드는 statefulset으로 생성한다. 그러면 파드의 이름이 db-0, db-1 처럼 순차적으로 이름이 부여되어 생성된다.
또한 db의 특징으로 0번 파드는 read/write, 1번 파드는 read 목적으로만 사용할 수 있다.
따라서 db에 트래픽을 전달할 때는 아무 파드로 전달하면 안된다. 각 파드에 상태가 있는 stateful한 상태이기 때문이다.
따라서 headless service를 사용하고 tcp:db-0.api-tester-3221 처럼 명시적으로 트래픽을 전달할 파드를 선택할 수 있다.
인프라 구성을 통해 알 수 있는 Service의 실체들

마스터 노드에는 주요 쿠버네티스 컴포넌트들이 설치된다.
kub-proxy 처럼 모든 노드에 설치되는 컴포넌트도 존재한다.
kube-proxy는 service network를 담당하는데, 이를 컨트롤하는 실체는 바로 linux의 iptables이다.
kube-proxy로 각 node의 iptables를 조작하는 것이다.
CNI calico는 pod network에 대한 대역폭을 만들어준다. 해당 대역에서 pod ip를 할당하는 것이다.
pod ip를 호출할 때도 해당 대역폭 내에서 통신한다. 또한 모든 노드에 calico의 proxy network가 존재한다.
서비스의 ip는 pod ip로 보내라는 rule을 등록하며, endpoint의 실체가 iptables의 rule이 되는 것이다(서비스 레지스트리).
모든 트래픽은 iptables로 이동하여 이 rule에 의해 파드로 전달되고 로드 밸런싱 또한 iptables가 수행한다.
이 때 iptables의 로드 밸런싱 방법은 라운드 로빈 방식이며 변경할 수 없다. 변경하려면 다른 로드밸런서를 설치해야 한다.
nodePort로 서비스를 만들면 모든 노드에 포트가 할당된다. 해당 포트로 들어온 트래픽은 각 워커 노드의 iptables로 전달된다.
iptables로 전달된 트래픽은 clusterIP가 했던 역할을 동일하게 수행한다.
만약 다른 노드의 nodePort로 트래픽이 들어가게 되더라도 pod가 어떤 노드에 만들어져 있는지 정보를 알고 있기 때문에 kube-proxy가 트래픽을 라우팅을 시켜준다.
인프라에서의 로드 밸런서의 역할은 다음과 같다.
라우터는 외부 사용자가 인프라 내부로 통신하기 위함이다. 게이트웨이는 인프라 내부의 통신을 만들어준다. 대역을 설정해서 서버를 연결하면 해당 대역 안에서 서버들의 IP가 할당되는 것이다.
그렇다면 외부 사용자들에게 내 쿠버네티스 서비스를 어떻게 오픈할까?
먼저 라우터에 서비스를 위한 외부 전용 IP를 하나 생성한다.
다음으로 로드 밸런서를 구축하여 외부 전용 IP 트래픽이 들어올 수 있도록 라우터를 설정한다.
로드 밸런서에서 트래픽을 모든 워커 노드의 nodePort로 연결하면 분산되어 파드로 전달된다.
이 역할을 해주는 것이 LoadBalancer 타입의 서비스이다.
쿠버네티스 기본 컴포넌트로 coreDNS가 존재한다.
서비스 생성 시 coreDNS 서버에는 서비스 이름과 IP가 등록된다.
pod에서 서비스 IP로 호출을 해야하는데 사용자는 서비스 이름만 알고 있다.
따라서 해당 서비스 이름을 넣으면 DNS 서버에 질의하여 IP를 확인하고 통신을 수행한다.
ClusterIP 서비스를 만들 때 None으로 설정하면 headless service가 된다.
이 때 서비스 이름으로 조회하면 연결된 모든 pod의 ip 목록을 받아올 수 있다.
중요한 포인트:
그냥 clusterIP를 쓰던 headless service를 쓰던 연결된 두 파드 중에 한곳으로 트래픽은 항상 전달된다.
하지만 차이점이 존재하고 다음과 같다.
파드에서 서비스 이름으로 호출하면 로드밸런싱을 iptables가 알아서 해준다. pod에 트래픽이 골고루 들어가는건 신경을 안쓰게된다. 여러 IP가 있는 도메인 이름을 호출하면 클라이언트 입장에서는 2개의 pod ip를 받아 “첫 번째” ip로 트래픽을 날린다. 결국 이때 클라이언트가 로드밸런싱을 신경써야 한다.
따라서 headless service의 도메인 이름을 통신 용도로 쓰면 안된다.
도메인 이름으로 통신을 할때는 꼭 clusterIP 형태의 서비스를 사용하자.
서비스 기능 확인
서비스 레지스트리 확인
vagrant@personal:~$ k get endpoints -n anotherclass-322
NAME                           ENDPOINTS                                 AGE
api-tester-3221-clusterip      192.168.13.223:8080,192.168.13.224:8080   48m
api-tester-3221-externalips    192.168.13.223:8080,192.168.13.224:8080   48m
api-tester-3221-loadbalancer   192.168.13.223:8080,192.168.13.224:8080   48m
api-tester-3221-nodeport       192.168.13.223:8080,192.168.13.224:8080   48m
database-headless              192.168.13.221,192.168.13.222             48m
iptables를 조회해 서비스에 매핑된 파드 IP 확인.
vagrant@personal:~$ sudo iptables -t nat -L | grep api-tester-3221-clusterip
KUBE-MARK-MASQ  all  --  192.168.13.223       anywhere             /* anotherclass-322/api-tester-3221-clusterip */
DNAT       tcp  --  anywhere             anywhere             /* anotherclass-322/api-tester-3221-clusterip */ tcp to:192.168.13.223:8080
KUBE-MARK-MASQ  all  --  192.168.13.224       anywhere             /* anotherclass-322/api-tester-3221-clusterip */
DNAT       tcp  --  anywhere             anywhere             /* anotherclass-322/api-tester-3221-clusterip */ tcp to:192.168.13.224:8080
KUBE-SVC-75EDFH2KIPGE4CBZ  tcp  --  anywhere             10.98.202.82         /* anotherclass-322/api-tester-3221-clusterip cluster IP */ tcp dpt:http
KUBE-MARK-MASQ  tcp  -- !192.168.0.0/16       10.98.202.82         /* anotherclass-322/api-tester-3221-clusterip cluster IP */ tcp dpt:http
KUBE-SEP-LL6NYWJHY5PIMSZA  all  --  anywhere             anywhere             /* anotherclass-322/api-tester-3221-clusterip -> 192.168.13.223:8080 */ statistic mode random probability 0.50000000000
KUBE-SEP-VNM7F66U4TOHCZPL  all  --  anywhere             anywhere             /* anotherclass-322/api-tester-3221-clusterip -> 192.168.13.224:8080 */
nodePort로 만들어진 서비스 확인
# LISTENING된 Port는 조회되지 않음.
vagrant@personal:~$ sudo netstat -anp | grep 30221
vagrant@personal:~$ sudo iptables -t nat -L KUBE-NODEPORTS -n | grep api-tester-3221-nodeport
KUBE-EXT-E3IKHJQFMX3QAKH2  tcp  --  0.0.0.0/0            0.0.0.0/0            /* anotherclass-322/api-tester-3221-nodeport */ tcp dpt:30221
모든 트래픽은 tcpdump를 이용해 확인할 수 있다.
vagrant@personal:~$ ip addr
3: enp0s8: <BROADCAST,MULTICAST,UP,LOWER_UP> mtu 1500 qdisc fq_codel state UP group default qlen 1000
    link/ether 08:00:27:b5:a4:57 brd ff:ff:ff:ff:ff:ff
    inet 192.168.56.33/24 brd 192.168.56.255 scope global enp0s8
       valid_lft forever preferred_lft forever
    inet6 fe80::a00:27ff:feb5:a457/64 scope link
       valid_lft forever preferred_lft forever
인터페이스는 'enp0s8'이고, 이걸로 확인해보자.
vagrant@personal:~$ sudo tcpdump -i enp0s8 port 30221
tcpdump: verbose output suppressed, use -v or -vv for full protocol decode
listening on enp0s8, link-type EN10MB (Ethernet), capture size 262144 bytes

# http://192.168.56.33:30221/info
# 위 주소로 api 요청을 수행하여 트래픽 보내기.

21:22:17.475486 IP 192.168.56.1.62994 > hello.kiamol.local.30221: Flags [S], seq 2058679445, win 65535, options [mss 1460,nop,wscale 8,nop,nop,sackOK], length 0
21:22:17.477123 IP hello.kiamol.local.30221 > 192.168.56.1.62994: Flags [S.], seq 1401410123, ack 2058679446, win 64800, options [mss 1440,nop,nop,sackOK,nop,wscale 7], length 0
21:22:17.481298 IP 192.168.56.1.62994 > hello.kiamol.local.30221: Flags [.], ack 1, win 255, length 0
21:22:17.481298 IP 192.168.56.1.62994 > hello.kiamol.local.30221: Flags [P.], seq 1:477, ack 1, win 255, length 476
21:22:17.481411 IP hello.kiamol.local.30221 > 192.168.56.1.62994: Flags [.], ack 477, win 503, length 0
21:22:17.482679 IP hello.kiamol.local.30221 > 192.168.56.1.62994: Flags [P.], seq 1:434, ack 477, win 503, length 433
21:22:17.531123 IP 192.168.56.1.62994 > hello.kiamol.local.30221: Flags [.], ack 434, win 254, length 0
서비스 디스커버리
서비스 이름으로 DNS 호출
sh-4.2# nslookup api-tester-3221-clusterip
Server:         10.96.0.10
Address:        10.96.0.10#53

Name:   api-tester-3221-clusterip.anotherclass-322.svc.cluster.local
Address: 10.98.202.82

sh-4.2# curl api-tester-3221-clusterip/info
<b>[Version] :</b> Api Tester v3.0.0<br><b>[Profile] :</b> dev<br><b>[Role] :</b> ALL (option: ALL, GET, POST, PUT, DELETE)<br><b>[Database]</b><br>driver-class-name : org.postgresql.Driver<br>url : jdbc:postgresql://postgresql:5431<br>username : dev<br>password : dev123
sh-4.2#
sh-4.2# curl 10.98.202.82/info
<b>[Version] :</b> Api Tester v3.0.0<br><b>[Profile] :</b> dev<br><b>[Role] :</b> ALL (option: ALL, GET, POST, PUT, DELETE)<br><b>[Database]</b><br>driver-class-name : org.postgresql.Driver<br>url : jdbc:postgresql://postgresql:5431<br>username : dev<br>password : dev123
sh-4.2#
sh-4.2# curl api-tester-3221-clusterip.anotherclass-322/info
<b>[Version] :</b> Api Tester v3.0.0<br><b>[Profile] :</b> dev<br><b>[Role] :</b> ALL (option: ALL, GET, POST, PUT, DELETE)<br><b>[Database]</b><br>driver-class-name : org.postgresql.Driver<br>url : jdbc:postgresql://postgresql:5431<br>username : dev<br>password : dev123
sh-4.2#
sh-4.2# curl api-tester-3221-clusterip.anotherclass-322.svc.cluster.local/info
<b>[Version] :</b> Api Tester v3.0.0<br><b>[Profile] :</b> dev<br><b>[Role] :</b> ALL (option: ALL, GET, POST, PUT, DELETE)<br><b>[Database]</b><br>driver-class-name : org.postgresql.Driver<br>url : jdbc:postgresql://postgresql:5431<br>username : dev<br>password : dev123
▶ api-tester-3221-clusterip : 같은 namespace에 있는 Service를 호출
▶ api-tester-3221-clusterip.anotherclass-322 : 다른 namespace에 있는 Service를 호출 (권장)
▶ api-tester-3221-clusterip.anotherclass-322**.svc.cluster.local** : 다른 cluster에 있는 Service를 호출 (쓰기 불편, 하지만 장점 있음)
Headless를 통해 Pod ip 목록을 확인.
vagrant@personal:~$ k get -n anotherclass-322 svc database-headless
NAME                TYPE        CLUSTER-IP   EXTERNAL-IP   PORT(S)   AGE
database-headless   ClusterIP   None         <none>        <none>    149m
vagrant@personal:~$ k exec -n anotherclass-322 init -it -- /bin/sh
sh-4.2# nslookup database-headless
Server:         10.96.0.10
Address:        10.96.0.10#53

Name:   database-headless.anotherclass-322.svc.cluster.local
Address: 192.168.13.222
Name:   database-headless.anotherclass-322.svc.cluster.local
Address: 192.168.13.221

sh-4.2# curl database-headless:8080/info
<b>[Version] :</b> Api Tester v3.0.0<br><b>[Profile] :</b> dev<br><b>[Role] :</b> ALL (option: ALL, GET, POST, PUT, DELETE)<br><b>[Database]</b><br>driver-class-name : org.postgresql.Driver<br>url : jdbc:postgresql://postgresql:5431<br>username : dev<br>password : dev123
sh-4.2#
sh-4.2# curl database-headless:8080/hostname
database-0sh-4.2# nslookup database-headless
Server: 10.96.0.10
Address: 10.96.0.10#53
Name: database-headless.anotherclass-322.svc.cluster.local
Address: 192.168.13.222
Name: database-headless.anotherclass-322.svc.cluster.local
Address: 192.168.13.221
sh-4.2# nslookup database-headless
Server: 10.96.0.10
Address: 10.96.0.10#53
Name: database-headless.anotherclass-322.svc.cluster.local
Address: 192.168.13.221
Name: database-headless.anotherclass-322.svc.cluster.local
Address: 192.168.13.222
nslookup을 반복해서 실행할 때마다 첫번째 address를 다르게 준다. CoreDNS 자체에서 IP 순서를 다르게 주는 것이다.
순환해서 주지 않으면 하나의 IP만 호출하게 된다. 최대한 headless service로 api 날리는 것을 지양하자.
Headless를 통해 만들어진 Pod의 DNS 사용하기 (nslookup <pod-name> <service-name>)
데이터 베이스(StatefulSet)에서 Pod를 선택해서 트래픽을 보내기 위해 사용한다.
vagrant@personal:~$ k get -n anotherclass-322 pod | grep database
database-0                        1/1     Running   0          153m
database-1                        1/1     Running   0          152m
vagrant@personal:~$ k get -n anotherclass-322 statefulsets.apps
NAME       READY   AGE
database   2/2     153m
vagrant@personal:~$ k exec -n anotherclass-322 init -it -- /bin/sh
sh-4.2# nslookup database-0.database-headless
Server:         10.96.0.10
Address:        10.96.0.10#53

Name:   database-0.database-headless.anotherclass-322.svc.cluster.local
Address: 192.168.13.221

sh-4.2# nslookup database-1.database-headless
Server:         10.96.0.10
Address:        10.96.0.10#53

Name:   database-1.database-headless.anotherclass-322.svc.cluster.local
Address: 192.168.13.222

sh-4.2# curl database-0.database-headless:8080/hostname
database-0
sh-4.2# curl database-1.database-headless:8080/hostname
database-1
백엔드에서 각 dns 이름을 등록해주면 된다.
'인프라' 카테고리의 다른 글
| [쿠버네티스] Nginx 설정 변경하기 - 로드밸런싱 방식, 로그 포맷(log format), 타임 존(timezone) 변경 (0) | 2025.03.11 |
|---|---|
| [쿠버네티스] Kubernetes에서 가장 이해하기 어려운 Ingress와 Nginx의 수 많은 기능들 (0) | 2025.03.11 |
| [쿠버네티스] Application 개발자가 꼭 알아야하는 Kubernetes Pod 기능 (2) - Pod 종료 시 안정적으로 Application 종료하기 (0) | 2025.03.08 |
| [쿠버네티스] Application 개발자가 꼭 알아야하는 Kubernetes Pod 기능 (1) - Pod 정보 조회하기 (1) | 2025.03.08 |
| 개발자 쿠버네티스 개발/테스트 환경 구축하기 (0) | 2025.03.07 |