
이전 포스팅 [2025.01.27 - [AI, 머신러닝] - RAG 코드 간단하게 구현하기] 에서 RAG 코드를 간단하게 구현해 봤습니다.
하지만 Generator 모델의 성능이 낮아 원하는 답변을 제대로 얻을 수 없었습니다.
이번 포스팅에서는 OpenAI API로 ChatGPT 모델을 불러와 고성능 generator 모델 역할을 맡기고,
전체 RAG 시스템의 동작을 trace하기 위해 langchain으로 RAG 코드를 구현해보겠습니다.
전체 코드 흐름은 이전 포스팅과 동일합니다.
0. Prerequisite
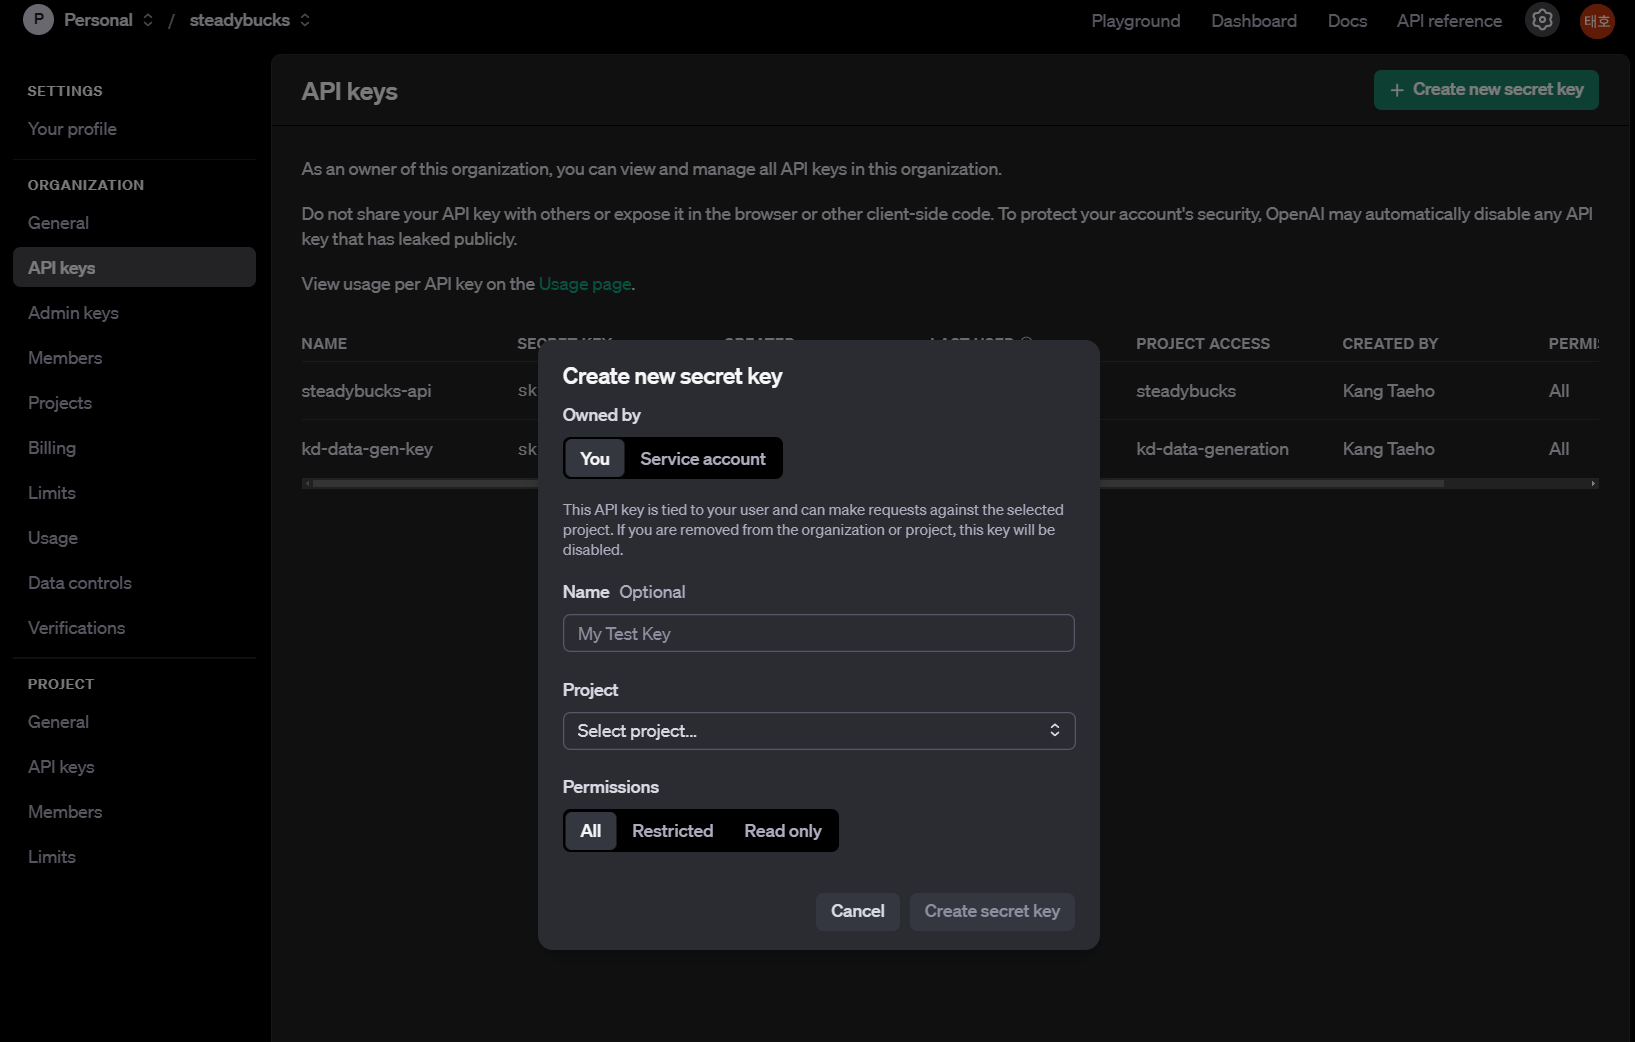
먼저 LangSmith와 OpenAI API에 대한 API Key를 생성해줍니다.
OpenAI: https://platform.openai.com/settings/organization/api-keys
LangSmith: https://smith.langchain.com/
!pip install -U langchain langchain-openai langchain-community langchain-huggingface chromadb
이후 필요한 라이브러리들을 pip로 설치해줍니다.
import getpass
import os
os.environ["OPENAI_API_KEY"] = getpass.getpass("Enter API key for OpenAI: ")getpass로 OpenAI API key를 입력해주고 환경변수로 설정합니다.
os.environ["LANGCHAIN_TRACING_V2"] = "true"
os.environ["LANGSMITH_ENDPOINT"] = "https://api.smith.langchain.com"
os.environ["LANGCHAIN_API_KEY"] = getpass.getpass("Enter your LangSmith API key: ")
os.environ["LANGCHAIN_PROJECT"] = "practice-RAG"마찬가지로 LangChain에 대한 api key도 등록합니다.
이때 LANGCHAIN_PROJECT로 등록된 환경변수 값으로 실제 내 langsmith 계정의 project로 생성되고 추적할 수 있습니다.
import logging
from dataclasses import dataclass
import datasets

from langchain_text_splitters import RecursiveCharacterTextSplitter
from langchain_huggingface import HuggingFaceEmbeddings
from langchain_community.vectorstores import FAISS, Chroma
from langchain_openai import ChatOpenAI
from langchain import hub
from langchain.chains import create_retrieval_chain
from langchain.chains.combine_documents import create_stuff_documents_chain# ----------------------------------------------------------------------
# Logging Setup
# ----------------------------------------------------------------------
logging.basicConfig(
level=logging.INFO,
format="%(asctime)s [%(levelname)s] %(name)s - %(message)s"
)
logger = logging.getLogger("RAG-LangChain-Example")
# ----------------------------------------------------------------------
# Configuration
# ----------------------------------------------------------------------
@dataclass
class RAGConfig:
"""
Holds configuration variables for the RAG pipeline.
"""
dataset_name: str = "ag_news" # Hugging Face dataset to load
dataset_split: str = "train[:1000]" # only load a slice for demonstration
chunk_size: int = 512
chunk_overlap: int = 50
hf_embedding_model: str = "sentence-transformers/all-MiniLM-L6-v2"
retrieval_qa_chat_prompt: str = "langchain-ai/retrieval-qa-chat"
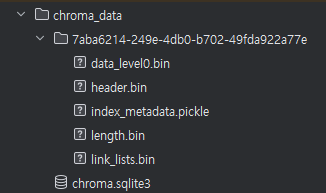
vectorstore_persist_dir: str = "./chroma_data"
openai_model_name: str = "gpt-4o-mini" # or "gpt-4o"
openai_temperature: float = 0.0
top_k: int = 3
@dataclass
class NewsDataItem:
"""
Represents a single news item with text and metadata.
"""
text: str
label: int
이후 필요한 모듈들을 import하고 logger, config, dataclass 선언까지하면 prerequisite는 끝입니다.
1. 데이터셋 생성
# Dataset 로딩
logger.info(f"Loading dataset: {RAGConfig.dataset_name} [{RAGConfig.dataset_split}]")
ds = datasets.load_dataset(RAGConfig.dataset_name, split=RAGConfig.dataset_split)

# Convert to a simpler python list of NewsDataItem
data_items = []
for row in ds:
    data_items.append(NewsDataItem(text=row["text"], label=row["label"]))
logger.info(f"Loaded {len(data_items)} news items.")
데이터셋은 이전 포스팅과 마찬가지로 topic classification용 데이터셋인 ag_news를 사용합니다.
Dataset type의 객체를 List[NewsDataItem] type으로 변환합니다
2. Document 생성
# Document 생성
from langchain.schema import Document

text_splitter = RecursiveCharacterTextSplitter(
    chunk_size=RAGConfig.chunk_size,
    chunk_overlap=RAGConfig.chunk_overlap,
    length_function=len,
    is_separator_regex=False
)

# Convert each NewsDataItem to a Document
docs = []
for item in data_items:
    # metadata example: store label
    splitted = text_splitter.split_text(item.text)
    for chunk in splitted:
        docs.append(Document(page_content=chunk, metadata={"label": item.label}))

logger.info(f"Total chunked documents: {len(docs)}")
이후 뉴스 데이터에 대해 langchain의 RecursiveCharacterTextSplitter로 텍스트를 분할합니다.
이 text splitter는 입력된 문자들을 기준으로 순서대로 텍스트를 분할합니다. 기본 문자는 ["\n\n", "\n", " ", ""] 으로 각각 단락 -> 문장 -> 단어 순서로 재귀적으로 분할하기 위함입니다.
chunk_size로 각 텍스트 chunk의 크기를 제한하고, chunk_overlap은 chunk간 중복되는 문자를 허용하는 개수입니다.
['Undersea Habitat Becomes Experimental Space Hospital NASA -- The days of doctors making house calls may seem like ancient history for most patients in North America, but in October, three astronauts and a Canadian doctor will test the latest concepts in long-distance house calls using a unique underwater laboratory.
The ability to conduct long-distance health care such as telemonitoring and telerobotic surgery could be key to maintaining the wellness of future spacefarers and responding to medical',
'of future spacefarers and responding to medical emergencies on the International Space Station, the moon or Mars...']
chunk가 2개 이상 생기는 예시를 하나 가져와 보면, 'of the future...' 이후 문자열이 일부 중복되고 있습니다.
text splitter로 데이터를 chunk단위로 쪼갠 뒤 각 chunk에 대하여 Document 객체로 변환하여 저장합니다.
결과 예시는 아래와 같습니다.
Document(metadata={'label': 2}, page_content="Chrysler's Bling King After a tough year, Detroit's troubled carmaker is back -- thanks to a maverick designer and a car that is dazzling the hip-hop crowd")
3. VectorStore
# ChromaDB 설정
from chromadb.config import Settings
logger.info("Initializing HuggingFace embeddings...")
embedding_fn = HuggingFaceEmbeddings(model_name=RAGConfig.hf_embedding_model)

logger.info("Building Chroma vector store...")

# If you want persistence:
vectorstore = Chroma.from_documents(
    collection_name="news_collection",
    embedding=embedding_fn,
    documents=docs,
    persist_directory=RAGConfig.vectorstore_persist_dir,
    client_settings=Settings(anonymized_telemetry=False)
)
다음은 각 Document에 대한 embedding을 저장할 VectorStore를 생성합니다.
이전 포스팅에서는 FAISS를 사용했지만 여기서는 ChromaDB를 사용해보겠습니다. FAISS도 LangChain에서 여전히 사용가능합니다.
먼저 각 document embedding을 계산해줄 모델을 불러옵니다. "sentence-transformers/all-MiniLM-L6-v2"를 사용합니다
이후 Chroma.from_documents()로 document list를 가지고 Chroma vectorstore를 생성합니다.
- collection_name: 컬렉션 이름
- embedding: 임베딩 모델
- documents: Vector Store에 저장할 문서 리스트
- persist_directory: 컬렉션을 저장할 디렉토리 경로. 기본값은 None이며 이 경우 메모리에 저장한다.
vectorstore 생성 후 샘플 데이터를 출력해보면 다음과 같습니다.
# vectorstore.get() << 전체 데이터 출력
vectorstore.get(ids="5fab8d63-5fa0-4eeb-b328-38571818f8fb")

### output
{'ids': ['5fab8d63-5fa0-4eeb-b328-38571818f8fb'],
 'embeddings': None,
 'documents': ["Wall St. Bears Claw Back Into the Black (Reuters) Reuters - Short-sellers, Wall Street's dwindling\\band of ultra-cynics, are seeing green again."],
 'uris': None,
 'data': None,
 'metadatas': [{'label': 2}],
 'included': [<IncludeEnum.documents: 'documents'>,
  <IncludeEnum.metadatas: 'metadatas'>]}
4. RAG Chain 생성
"""
Builds a RetrievalQA chain with an OpenAI LLM as generator.
"""
logger.info("Initializing OpenAI LLM and retrieval chain...")
_llm = ChatOpenAI(
model_name=RAGConfig.openai_model_name,
temperature=RAGConfig.openai_temperature
)
# Retrieve top-k docs
retriever = vectorstore.as_retriever(
search_kwargs={"k": RAGConfig.top_k}
)
# pull prompt
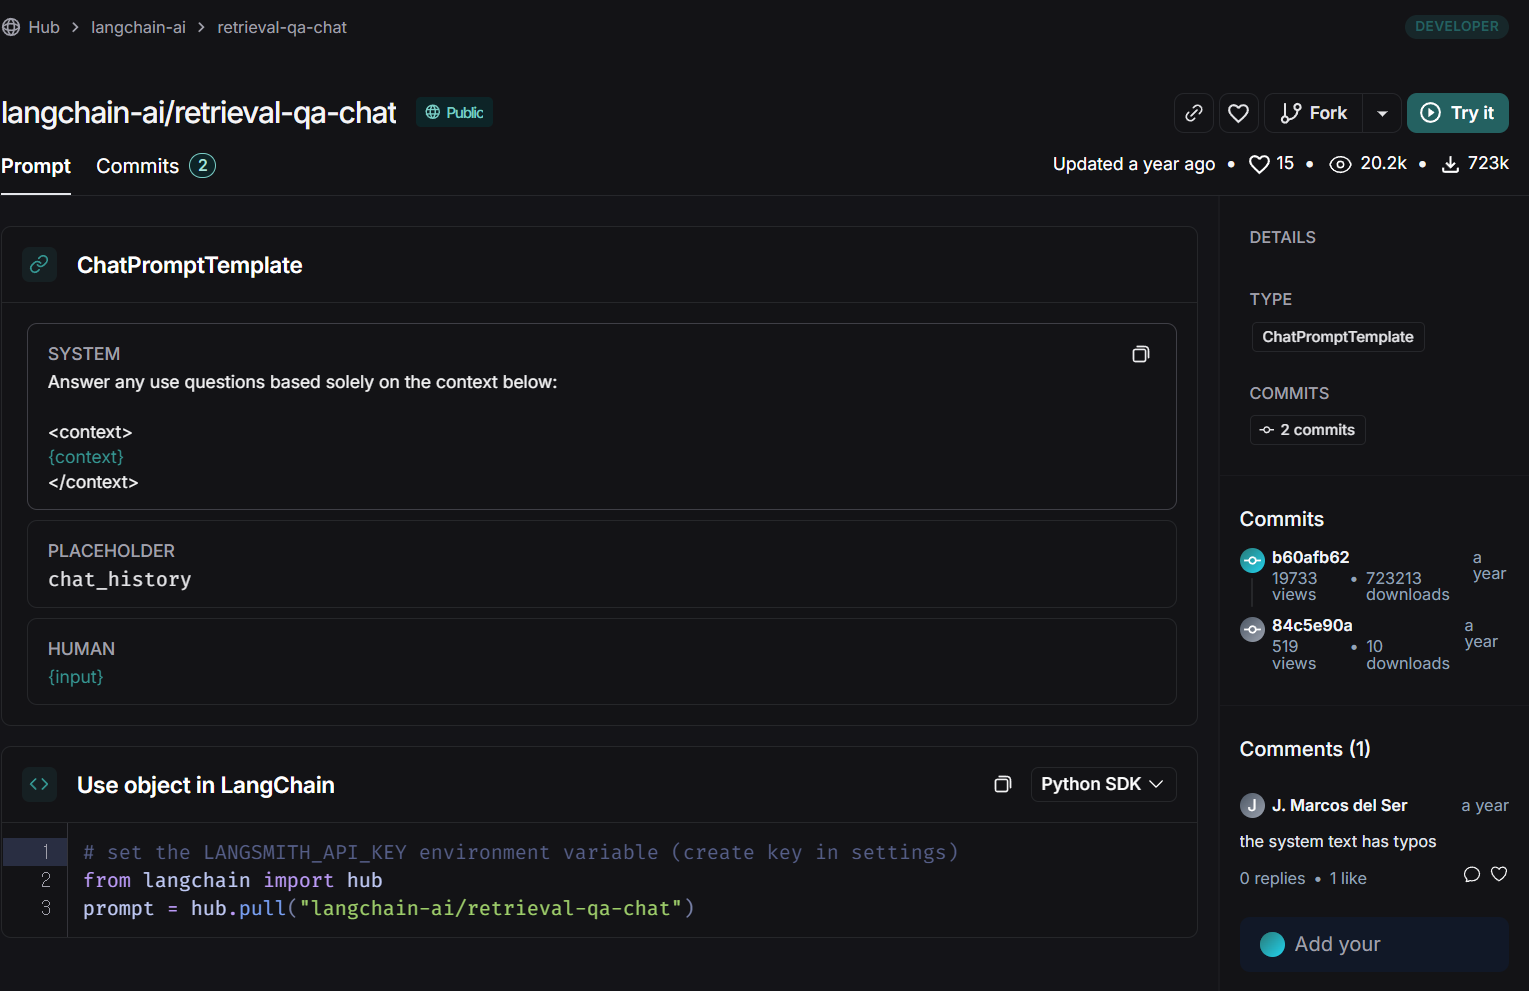
logger.info("Pull QA Chat Prompt from hub...")
_qa_prompt = hub.pull(f"{RAGConfig.retrieval_qa_chat_prompt}")
# Build the chain
logger.info("Creating RAG Chain...")
combine_docs_chain = create_stuff_documents_chain(_llm, _qa_prompt)
_qa_chain = create_retrieval_chain(retriever, combine_docs_chain)
RAG Chain 만드는 코드입니다.
- 먼저 ChatOpenAI()로 generator 역할을 해줄 ChatGPT-4o-mini 모델을 불러옵니다.
- retriever는 위에서 생성한 vectorestore의 .as_retriever() 메소드를 call하면 retriever 객체가 됩니다. top-k도 설정해줍니다.
- prompt를 설정합니다. 직접 prompt를 생성할 수도 있고, langsmith hub에서 pull할 수도 있습니다.
- rag chain을 설정합니다.
- create_stuff_documents_chain: Generator 모델과 prompt를 지정합니다.
- create_retrieval_chain: RAG Chain에 retriever를 지정해준다. prompt의 {context}에 retriever가 찾은 Document의 내용으로 치환됩니다.
설정한 rag chain은 invoke() 함수로 실행합니다. 파라미터는 prompt의 각 {} 변수에 값을 넣어주면 됩니다.
우리가 hub에서 pull한 prompt에는 {context}, {input} 두 변수가 존재하는데, {context}는 retriever가 찾은 document 내용으로 알아서 치환되기 때문에 {input}만 사용자의 query로 입력해주면 됩니다.
실행 결과는 아래와 같습니다.
_qa_chain.invoke({"input": "When does google open their auction?"})

### output
2025-01-28 01:30:48,373 [INFO] httpx - HTTP Request: POST https://api.openai.com/v1/chat/completions "HTTP/1.1 200 OK"

{'input': 'When does google open their auction?',
 'context': [Document(metadata={'label': 2}, page_content='Google auction begins on Friday An auction of shares in Google, the web search engine which could be floated for as much as \\$36bn, takes place on Friday.'),
  Document(metadata={'label': 2}, page_content="In Google's Auction, It's Not Easy to Tell a Bid From a Bet In a competition combining suspense and strategy, countless brave souls are hoping to buy a small piece of Google in an auction this week."),
  Document(metadata={'label': 3}, page_content="Google IPO Bidding Opens Google IPO Bidding Opens\\\\Google's IPO bidding is officially open. Google and its underwriters expect to open the auction for the shares of Google rsquo;s Class A common stock at 9:00 a.m. EST (press time) on Friday, August 13, 2004. Google bidders must have obtained a bidder ID from ipo.google.com if you ...")],
'answer': "Google's auction opens at 9:00 a.m. EST on Friday, August 13, 2004."}우리가 입력한 input, retriever가 찾은 context, generator가 생성한 answer 모두 확인할 수 있습니다.
추가로, "# Build the chain" 주석의 하위 코드를 아래와 같이 LCEL 인터페이스를 사용해 구현할 수도 있습니다.
from langchain_core.runnables import RunnablePassthrough
from langchain_core.output_parsers import StrOutputParser

# LCEL 인터페이스 사용
_qa_chain_lcel = (
    {"context": retriever, "input": RunnablePassthrough()}
    | _qa_prompt
    | _llm
    | StrOutputParser()
)_qa_chain_lcel.invoke("When does google open their auction?")
### output
2025-01-27 23:53:15,366 [INFO] httpx - HTTP Request: POST https://api.openai.com/v1/chat/completions "HTTP/1.1 200 OK"
"Google's auction opens at 9:00 a.m. EST on Friday, August 13, 2004."
이 경우 Runnable 인터페이스로 RAG Chain이 동작하며 결과는 동일한 것을 확인할 수 있습니다.
다만 lcel 형식으로 chain을 선언하면 StrOutputParser()의 결과로 generator가 생성한 output만 확인할 수 있습니다.
5. LangSmith Trace 확인하기.
0. Prerequiste 환경변수 설정 시 langsmith 대시보드에서 해당 rag chain에 대한 히스토리를 추적할 수 있습니다.
Tracing projects에 들어가면 우리가 project name으로 지정했던 "practice-RAG"가 생성된것을 확인 할 수 있습니다.
여기서 해당 프로젝트에 대한 정보를 한 눈에 확인할 수 있습니다.

해당 프로젝트를 클릭해 들어가보면
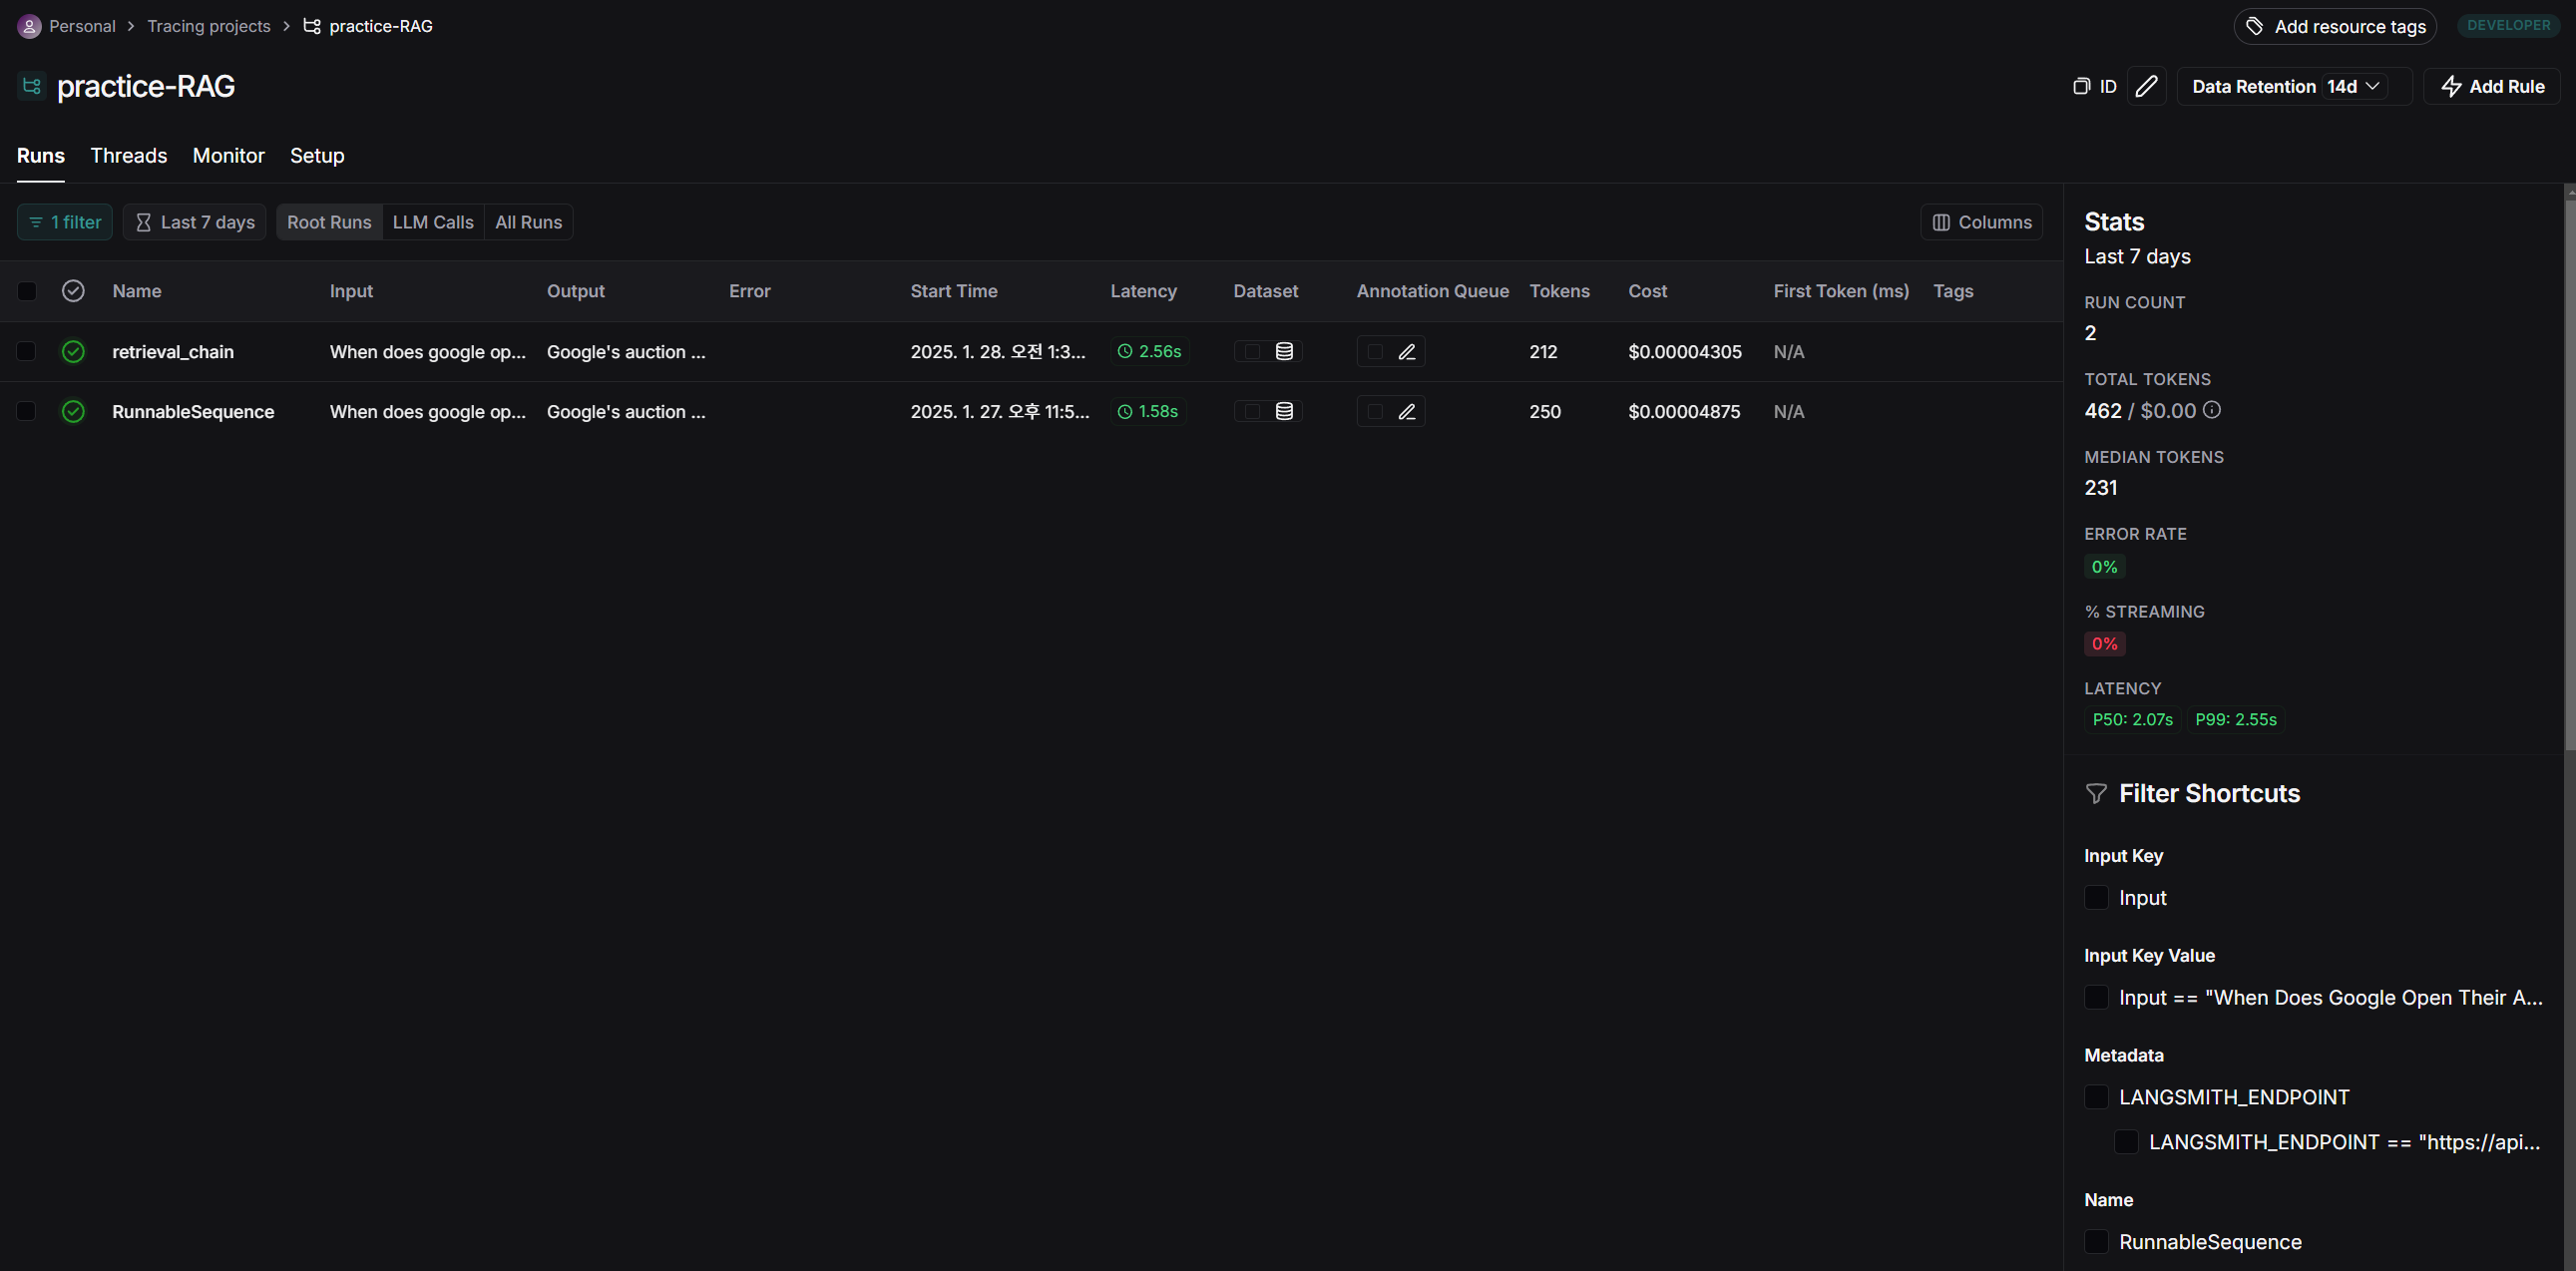
우리가 방금 테스트로 실행했던 2개의 query에 대한 히스토리가 저장되어 있습니다.
RAG chain을 두 가지 방식으로 구현해서 테스트 했으니 retireval_chain과 RunnableSequence 두 개 다른 type의 history가 존재합니다.
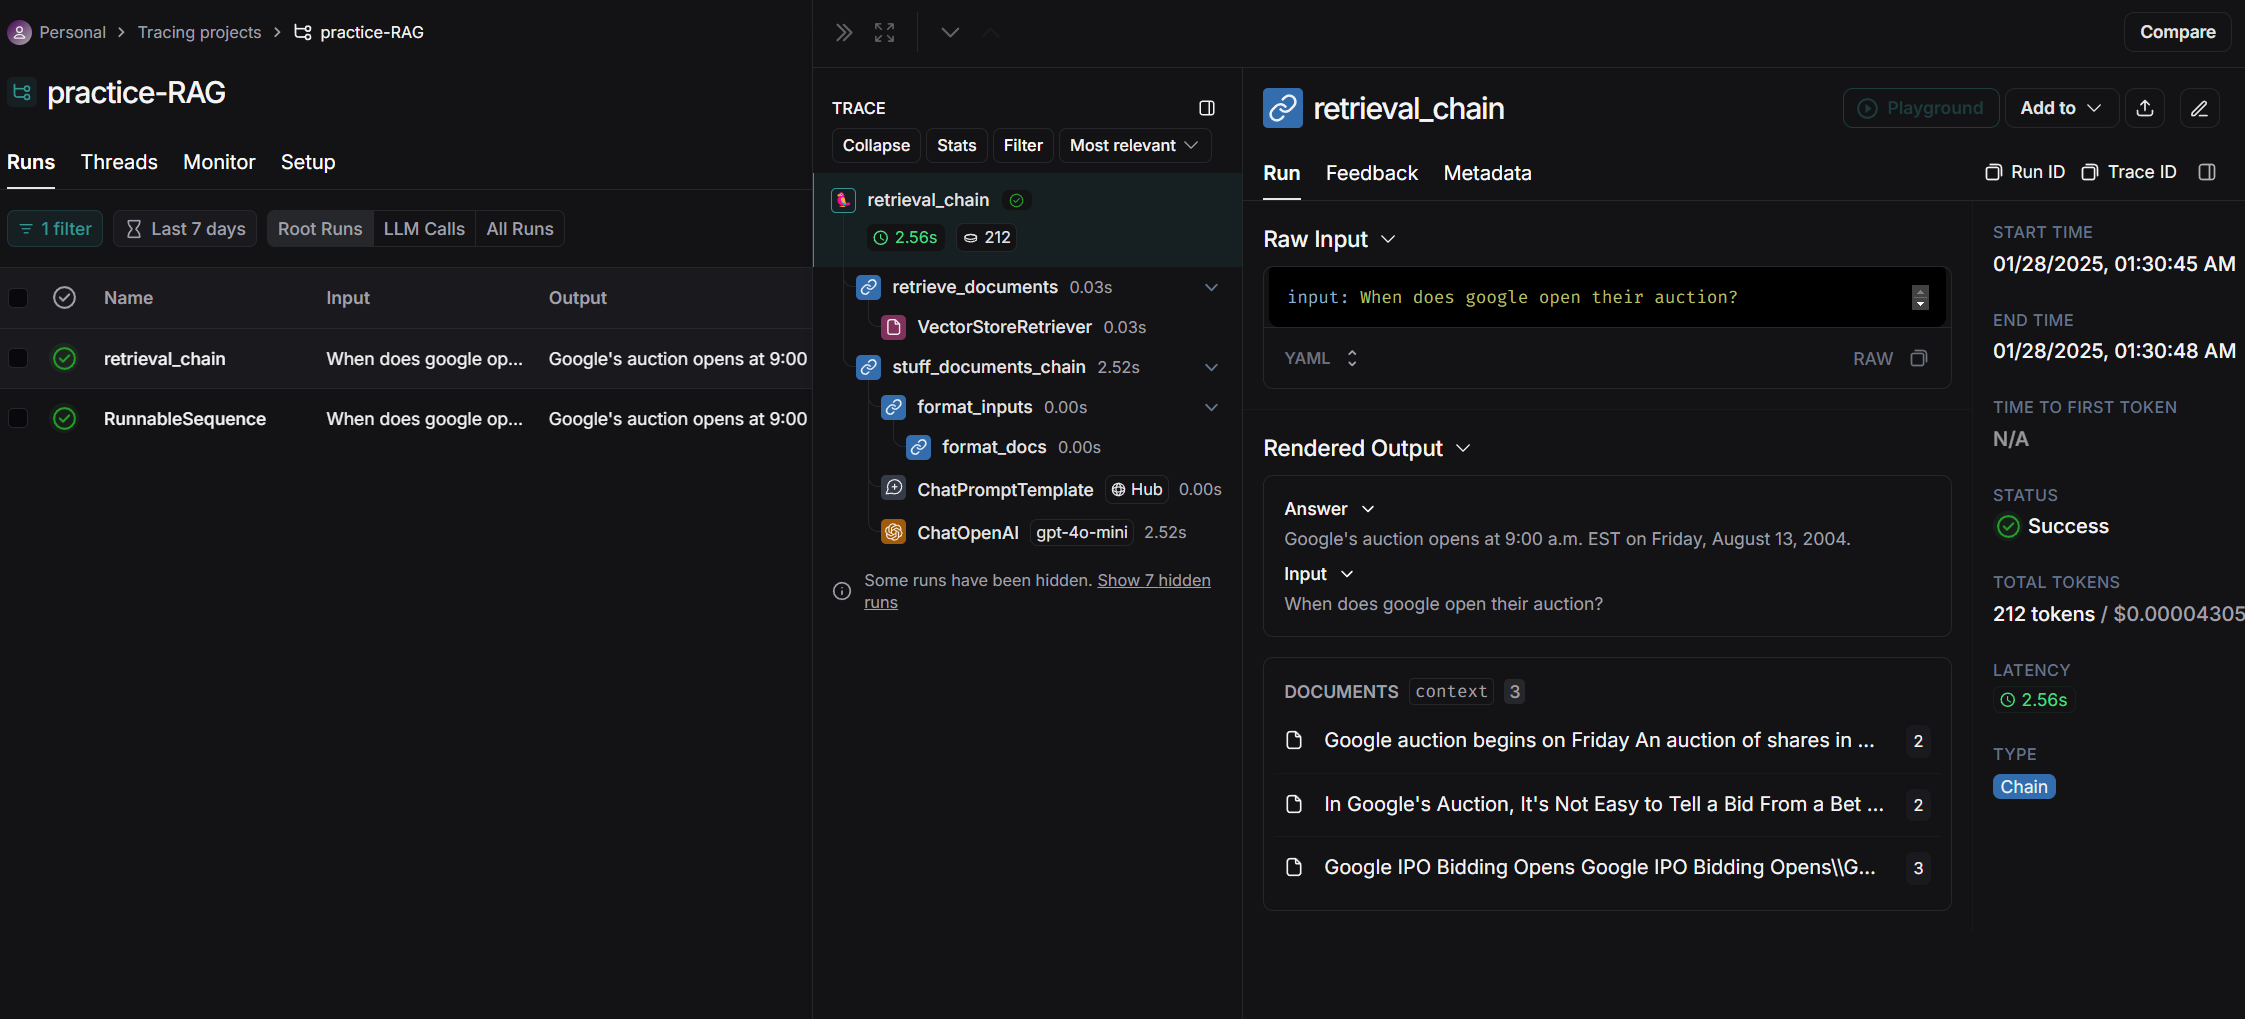
각 trajectory를 눌러보면 우리가 chain으로 설정한 각 단계별로 결과를 확인할 수 있습니다.
두 방식의 차이점이라면 retrieval chain은 document의 text만 prompt에 넣어주는 반면
RunnalbeSequence는 Document object 자체를 toString()해서 prompt에 넣어주는 형태입니다.
## retrieval chain
Answer any use questions based solely on the context below:

<context>
Google auction begins on Friday An auction of shares in Google, the web search engine which could be floated for as much as \$36bn, takes place on Friday.

In Google's Auction, It's Not Easy to Tell a Bid From a Bet In a competition combining suspense and strategy, countless brave souls are hoping to buy a small piece of Google in an auction this week.

Google IPO Bidding Opens Google IPO Bidding Opens\\Google's IPO bidding is officially open. Google and its underwriters expect to open the auction for the shares of Google rsquo;s Class A common stock at 9:00 a.m. EST (press time) on Friday, August 13, 2004. Google bidders must have obtained a bidder ID from ipo.google.com if you ...
</context>

## RunnableSequence
Answer any use questions based solely on the context below:

<context>
[Document(metadata={'label': 2}, page_content='Google auction begins on Friday An auction of shares in Google, the web search engine which could be floated for as much as \\$36bn, takes place on Friday.'), Document(metadata={'label': 2}, page_content="In Google's Auction, It's Not Easy to Tell a Bid From a Bet In a competition combining suspense and strategy, countless brave souls are hoping to buy a small piece of Google in an auction this week."), Document(metadata={'label': 3}, page_content="Google IPO Bidding Opens Google IPO Bidding Opens\\\\Google's IPO bidding is officially open. Google and its underwriters expect to open the auction for the shares of Google rsquo;s Class A common stock at 9:00 a.m. EST (press time) on Friday, August 13, 2004. Google bidders must have obtained a bidder ID from ipo.google.com if you ...")]
</context>